This is my second fabric hunt in London, and it was so worth it!!
Last year I was in Soho mostly, and in Walthamstow Market. Last April, my patient love and yours sincerely spent four days in the UK capital, fabric shopping in the mornings and attending the fantastic Desert Fest during the afternoons/evenings.
Well, first day was a Friday and I decided to hit Goldhawk Street. WOW. Amazing. There are so many fabric shops, I could only enter half of them! We stopped for lunch at a Thai restaurant, and after lunch we got back to our hood, Candem town, where we had our rented room and the festival.
I bought silk and stretch cotton at Classical Textiles, linen and gorgeous Japanese cottons in another nearby shop, and then we entered Unique Fabrics: everything was silk, in every possible form and colour (twill, organza, crepe, velvet, etc etc... they also had wool, Kashmir, it was amazing! and the prices were quite reasonable too! I bought a gorgeous red wool-Kashmir, some viscose lining and a gorgeous black cotton shirting. I was in love with that shop and its two kind, knowledgeable attendants. I bought some Liberty cotton lawn at Misan..
Next morning we went to MaCulloch &Wallis. I imagined it bigger, haha!! I knew all their products by memory, and I had a list. I bought a gorgeous red napa skin, some good thermofusible interlining, some lining for my red coat...
 We went to The Village Haberdashery next and there I bought a bunch of C. Pauli organic jerseys and interlocks. Those are expensive, but gorgeous.
All in all I spend around 300 Euros. Pounds are quite all right now...in reference to the Euro. I was specially happy to have found Goldhawk road. Let's pray they don't close those shops down, they are like AliBaba's cave!
We had such a GREAT time with my super boyfriend. He was so charming and patient, giving me advice about fabric, carrying my heavy backpack, and keeping me good company. This is LOVE!
We went to The Village Haberdashery next and there I bought a bunch of C. Pauli organic jerseys and interlocks. Those are expensive, but gorgeous.
All in all I spend around 300 Euros. Pounds are quite all right now...in reference to the Euro. I was specially happy to have found Goldhawk road. Let's pray they don't close those shops down, they are like AliBaba's cave!
We had such a GREAT time with my super boyfriend. He was so charming and patient, giving me advice about fabric, carrying my heavy backpack, and keeping me good company. This is LOVE!
This was the Absolutely-Necessary-Dress-to-Go-to-London Project. I realized it was totally impossible to travel to London without THIS dress. It was April, a music festival, so I needed something spring-timy, black and comfortable and versatile.
I still had some "false" cotton I bought in my last trip to London in Walthamstow, perfect for this. It is interlock-thick, so I decided to use my "universal pattern" because it has raglan sleeves. I added a little bit of flare to the very short skirt, but not so much as to my coco pattern.
I applied some facing to the neck, folded to the inside and slip-stitched it to the dress. I committed the mistake of cutting wedges around the seam allowance, which made it to appear not round. In the cut places, it produces some picks. Never again.
The rest, so problem at all. Seam allowances are just cut 1cm wide and pressed open. Bottom dress and sleeves' hems are machine-stitched with the twin needle.
I love it! It's comfortable, elegant and cool! In these pics I am in Candemtown, just out of the festival, waiting for our table t Woody's.
I bought this gorgeous tartan cotton in Stone Fabrics, online. The design is mine, and I used this book to get the shirt pattern:
The idea of the book is great. It presents a bunch of bodice patterns, another of skirt patterns, some necks and sleeves, and the possibility to combine them all to get a huge number of possibilities.
This was the first time I tried a pattern from this book and it proved sadly wrong.
I took the shirt pattern and combined it with a sleeve and a collar with a stand.
 |
| Bodice Pattern |
The sleeve had a good match to the bodice, but the neck cut was too deep for a shirt collar, and the stand was far too long for the collar. I don't like the result at all. I will wear it, because all in all, it is a very nice and comfortable dress, but the shirt collar is not beautiful.
I also had to arrange the seams at the sides, they were too curved for my taste and figure, but that was an easy change to make. When I realized the collar was all wrong, it was too late, and nothing could be done to repair it. What a pity. I'll try another pattern, because the book is full of good designs and ideas, but I have to remember to bevery careful and true the paper pattern on the dress form before cutting anything.
Apart form that small flaw, the dress is cute, the fabric pattern gorgeous. It does not wrinkle too much for being cotton, and it is very comfortable to wear.
 |
| Inspiration | |
I now realize there should be more gathering in the skirt. I have some more fabric left, and I can repair it easily, adding another seam, which would be unconspicious in this fabric. But I am lazy to undo and redo things, so maybe I'll leave it for next season!
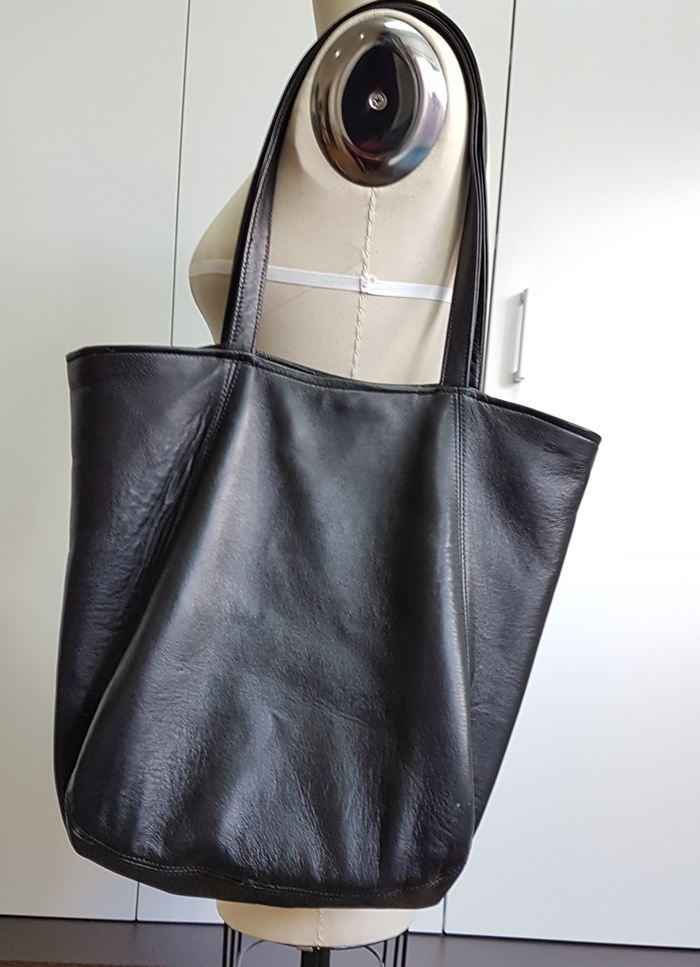
I had almost 1 skin and a half left from the 4 lamb skins I got for my leather jacket.I wanted to make myself a bag but I did not have any idea about the pattern. I though I'd figure something out...
Then I saw this colleague wearing a fake red leather bag, and it was an illumination. The pattern was perfect for its simplicity and perfect size and concept. I got some gauze and took the pattern by the rub-off method again! I totally recommend you to read this book, and you'll be able to copy any piece you can put your hands on, hehe! I am a copier, so kill me baby!!
I also had ordered some extra lining, and it proved perfect. I made a pocket for my phone and another for pen and keys, which have to be handy. Nothing else.
I am sorry to say my Bernina can only sew up to 3 layers of 0.8mm thick leather, so again I had to borrow my neighbour's industrial machine for leather, which is a monster that can sew everything. It's awesome.
I put another piece of leather, glued to bottom to reinforce it. This particular leather is super soft.
Well, as for the handles, I applied some interlining (as to the whole thing, of course), put some glue, folded them individually and finally attach them together by their wrong sides in a machine topstich.
I applied an 8 cm band to the lining, when this was completely finished, with the exception of a 10cm hole in the bottom seam. Then I applied it to the bag by the right sides, stitching it and folding it over towards the inside with the handles on. A topstitch next to the top rim, some magnet fastener, and sewing the bottom opening in the lining by hand.
A wonderful pattern. Will use it again. In brown, in red, in white... it has future! :-)